1771-OVN/AB IN STOCK& READY FOR SHIP
 Contact: Miya
 Job Title: Sales Manager
 Skype: live:miyazheng520
 Email: sales@amikon.cn
 Tel: 86-18020776792(Whats App )
 QQ :2851195450

Brand Name AB
Product reference 1771-OVN
DC (10 � 30V) Output Module
Cat. No. 1771�OVN
Installation Data
This document provides information on:
important pre-installation considerations
power supply requirements
installing the module
connecting the wiring
using the indicators on the module for troubleshooting
module specifications
The 1771-OVN dc output module is a sink output and requires a source
input. A source input provides a positive voltage path and a sink output
provides a path to ground.
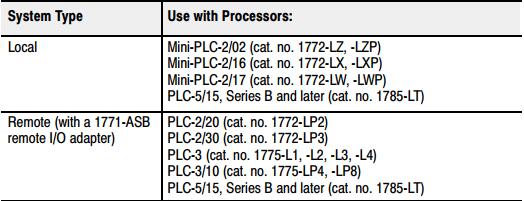
You must use this module in a 1771-A1B, -A2B, -A3B, -A3B1, -A4B or
later 1771 I/O chassis. Refer to the table below for processor compatibility

Do not place this module in the same I/O chassis as the 1771-IX
thermocouple module. You can use this module in the same chassis as the
1771-IXE thermocouple module.
Power Supply Requirements
The controller or I/O chassis power supply, connected through the
backplane of the I/O chassis, powers the logic circuitry of the output
modules. The maximum current drawn from this supply is 330mA.
Installing Your Module
In this section we tell you how to initially handle your module, key your
I/O chassis, install your module and make your wiring connections.
Inserting the Module Into the Chassis
1. Position the module so that the circuit board on the rear of the module
lines up with the top and bottom card guides in the chassis.
2. Slide the module into the chassis.
3. Press firmly to seat the module in the chassis backplane connector.
4. Swing the module locking latch down into place over the front edge
of the module.
Connecting Wiring to the Module
You make connections to the module through the field wiring arm cat. no.
1771-WN. The arm pivots on the I/O chassis to connect with terminals on
the front of the module and acts as a terminal strip. The wiring arm allows
the module to be removed from the chassis without disconnecting wiring.
1. Make certain all power is removed from the module before making
wiring connections.
2. Swing the wiring arm up into position on the front of the module. The
locking tab on the module will secure it into place.
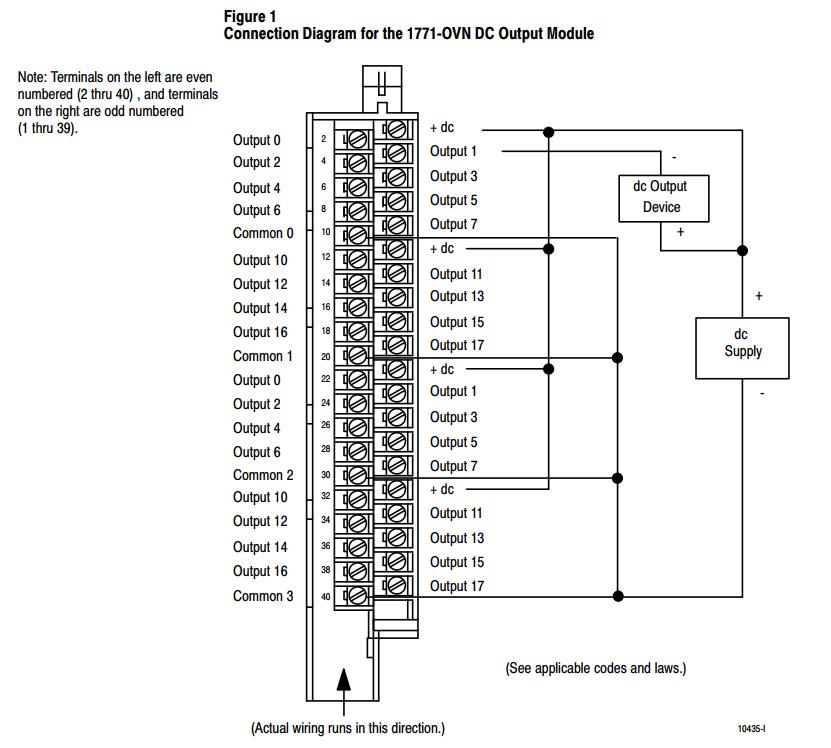
3. Make your connections to the field wiring arm as shown in Figure 1.
(Use the label on the front of the wiring arm to identify your wiring.)
I/O Module Groups
Each module condenses two full module groups (32 outputs) into each I/O
chassis slot. For example:
Module group 1 = inputs 00 through 17
Module group 2 = inputs 00 through 17 (module group 2
represents the second set of outputs).
In Figure 1, terminals 1 through 20 represent module group 1. Terminals
21 through 40 represent module group 2. Terminals 10, 20, 30 and 40 are
DC common and terminals 1, 11, 21 and 31 are DC power.

Related products
1756-LSP
1756-M02AE
1756-M02AS
1756-M03SE
1756-M08SE
1756-M08SEG
1756-M16SE
1756-OA8D
1756-OA8E
1756-OB16IEFS
1756-OB16IS
1756-OF4
1756-OF6CI
1756-OF6VI
1756-OF8
1756-OF8H
1756-PA72
1756-PA75
1756-PA75R
1756-PAR2
1756-PAXT
1756-PB72
1756-PB75
1756-PB75R
1756-PBR2
1756-PBXT
1756-PC75
1756-PH75
6ES7413-1XG01-0AB0 SIMATIC S7-400, CPU 413-1
6ES7413-2XG01-0AB0 CPU413-2DP, MPI/DP, 72KB
6ES7413-1XG02-0AB0 SIMATIC S7-400, CPU 413-1
6ES7413-2XG02-0AB0 CPU413-2DP, MPI/DP, 72KB
6ES7413-1XG00-0AB0 CPU413-1, MPI, 72KB
6ES7413-2XG00-0AB0 CPU413-2DP, MPI/DP, 72KB
ABB
CP1-10R-11
CP1-10G-11
CL2-502G
CL2-502Y
CL2-502R
CE4T-10R-11
CL2-523G
CE4T-10R-02
N44E 220-230V50HZ
N40E-220-230V50HZ
CA5-10
CA5-01
CAL5-11
CAL18-11
A9-40-00 220V-230V50Hz
A9-30-10*220-230V 50HZ/230-240V 60HZ
AF65-30-00-13 100-250V50/60HZ-DC
AF145-30-11*100-250V AC/DC
AF185-30-11*100-250V AC/DC
AF260-30-11*100-250V AC/DC
AF265-30-11-13 100-250V50/60HZ-DC
AF300-30-11*100-250V AC/DC
AF370-30-11-13 100-250V50/60HZ-DC
AF400-30-11*100-250V AC/DC
AF 460-30-11*100-250V AC/DC
AF580-30-11*100-250V AC/DC
AF750-30-11*100-250V AC/DC
AF1250-30-11*100-250V AC/DC
GAF 185-10-11**100-250V AC/DC
GAF460-10-11*100-250V AC/DC
GAF750-10-11*100-250V AC/DC
GAF 1250-10-11*100-250V AC/DC
A9-30-10*110V 50Hz/110-120V 60Hz
A9-30-10*220-230V 50Hz/230-240V 60Hz
A12-30-10*110V 50Hz/110-120V 60Hz
A12-30-10*220-230V 50Hz/230-240V 60Hz
A16-30-10*110V 50Hz/110-120V 60Hz
A16-30-10*220-230V 50Hz/230-240V 60Hz
A26-30-10*110V 50Hz/110-120V 60Hz
1756-PLS
1756-RIO
1756-RM
1756-RM2
1756-RM2XT
1756-RMXT
1756-SYNCH
1757-FFLD2
1757-FFLD4
1757-FFLDC2
1757-FFLDC4
1757-FIM
1757-PE1400RED2
1757-PE1600RED1
1757-PE1600RED2
1757-PE1800RED1
1757-PE1800RED2
1757-PIM
1757-PLX52
1757-PLXC
1757-PLXCGX200
1757-PLXCPE1400
1757-PLXCPE1600
1757-PLXCPE1800
1757-SRC100
1758-FLO301
1758-FLO302
1758-RTU201
1758-RTU202
1768-CNBR
1768-ENBT
1768-EWEB
1768-L43
1768-L43S
1768-L45
1768-L45S
1769-IF16C
1769-IF16V
1769-IR6
Our Advantages:
1.365 days warranty for all the goods from us.
2.2000+ suppliers with us, we could help you to get any components which is difficult to get.
3.Risk-free guarantee, 60 days refund. If the item you purchase from our store are not of perfected quality, simply return them to us for replacement or refund.

|
If you have any question pls do not hesitate to contact us.We can supply all kind of the
automation parts,if you want to purchase
parts pls send the parts model to my mail, I will prompt reply you as I receive the mail.Hope anyone inquire from us.
Waiting for your inquiry.
|
